
0. 준비작업
이전 포스팅
https://jinn-o.tistory.com/321
[SAML 2.0] IdP 와 SP 인증을 직접 구현해보자. (1) - IdP 설정
먼저 SAML 2.0 의 구조나 개념, 동작방식에 대해서 예습해오자.https://jinn-o.tistory.com/320 [SAML 2.0] Security Assertion Markup LanguageSAML 2.0 이란?OAuth 2.0 과 마찬가지로 인증/인가와 관련된 규칙들을 묶어서 표
jinn-o.tistory.com
먼저 SAML 2.0 의 구조나 개념, 동작방식에 대해서 예습해오자.
https://jinn-o.tistory.com/320
[SAML 2.0] Security Assertion Markup Language
SAML 2.0 이란?OAuth 2.0 과 마찬가지로 인증/인가와 관련된 규칙들을 묶어서 표준화한 방식이다.다만 이상한 점이 있다. MarkUp Language 라고 정의되어 있다. 먼저, OAuth 2.0 은 주로 인가(Authorization)와 관
jinn-o.tistory.com
해당 포스팅에서 SP-SpringBoot를 구현해 놓은 코드는 다음 Github 에 올려놓았다.
(시행착오 - 오류남)
https://github.com/SMJin/Security-SAML
GitHub - SMJin/Security-SAML: Spring Security SAML 2.0
Spring Security SAML 2.0 . Contribute to SMJin/Security-SAML development by creating an account on GitHub.
github.com
(추가 - 성공)
https://github.com/SMJin/SpringBoot-SAML
GitHub - SMJin/SpringBoot-SAML: Spring Boot 를 활용하여 SAML 2.0 방식의 SP *(Service Provider) 구축
Spring Boot 를 활용하여 SAML 2.0 방식의 SP *(Service Provider) 구축 - SMJin/SpringBoot-SAML
github.com
본격적으로 시작해보자.
1. Gradle Dependency 추가
implementation 'org.springframework.boot:spring-boot-starter-security' // Spring Security
implementation 'org.springframework.security:spring-security-saml2-service-provider' // SAML 2.0
2. Security 테스트
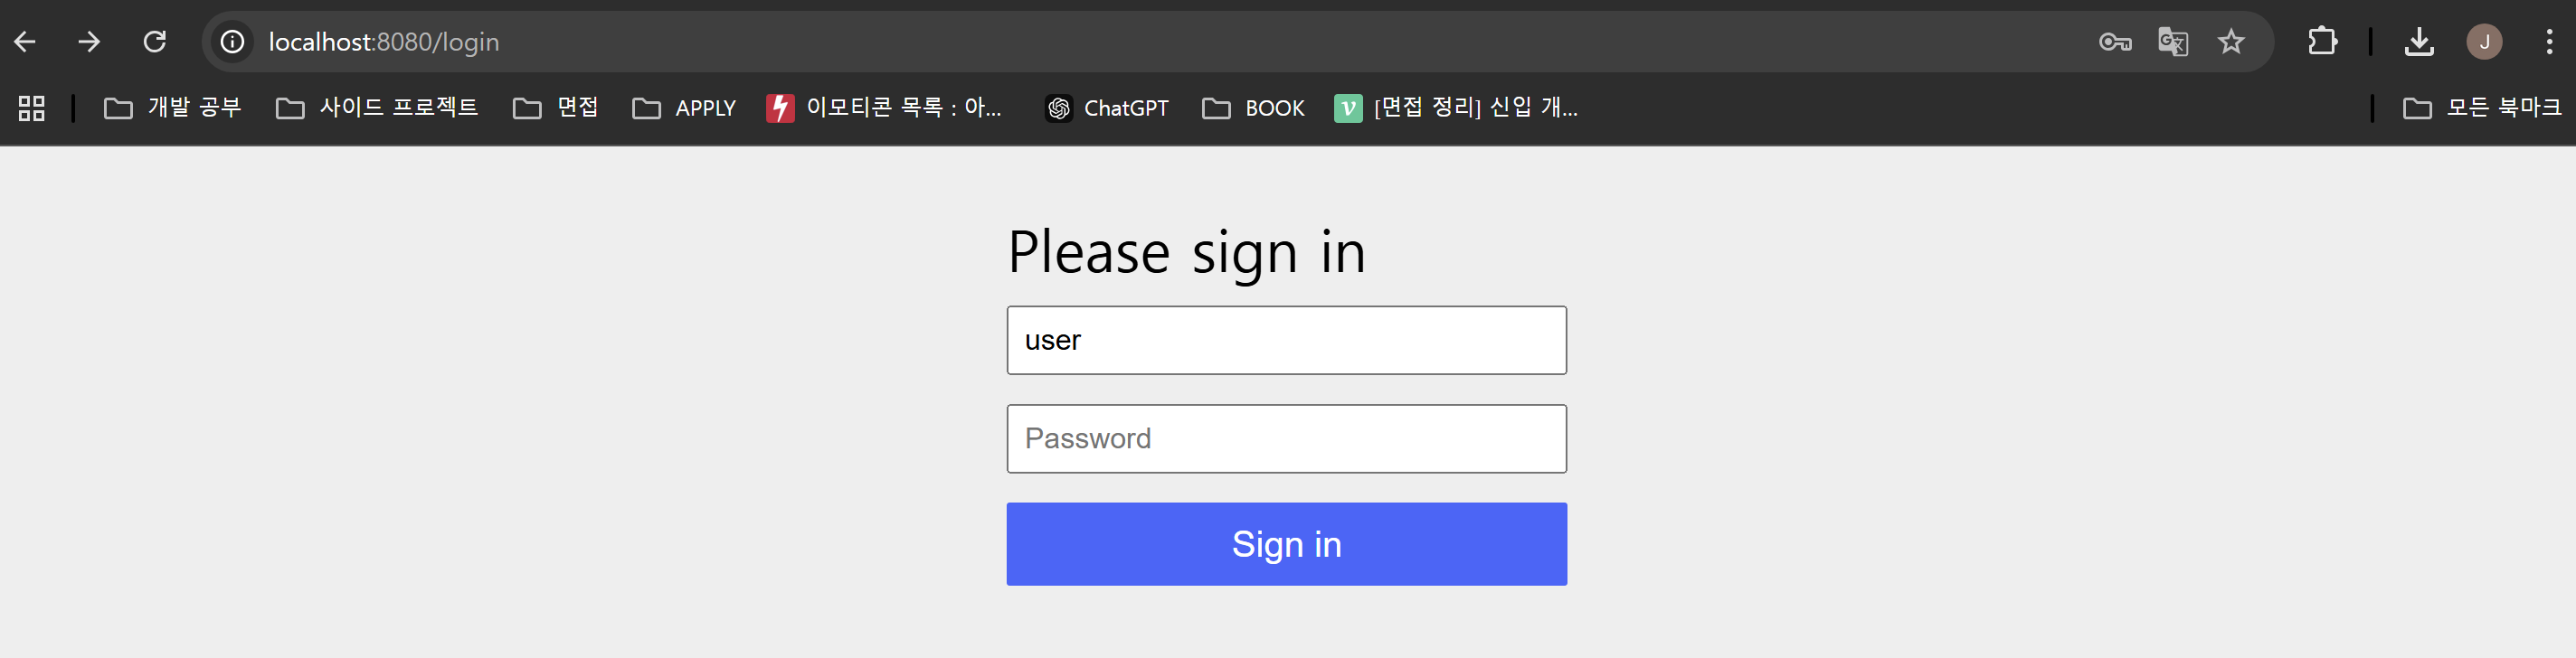
비밀번호는 실행 콘솔 창에 나와있다. 이 비밀번호는 실행할때마다 달라진다.

다음과 같이 오류 페이지가 뜨면 잘 된것이다. 왜냐하면 아무 컨트롤러도 만들어주지 않았기 때문.
Spring Security library 가 잘 implements 되었다.

3. spring-security-saml2-service-provider 라이브러리 오류
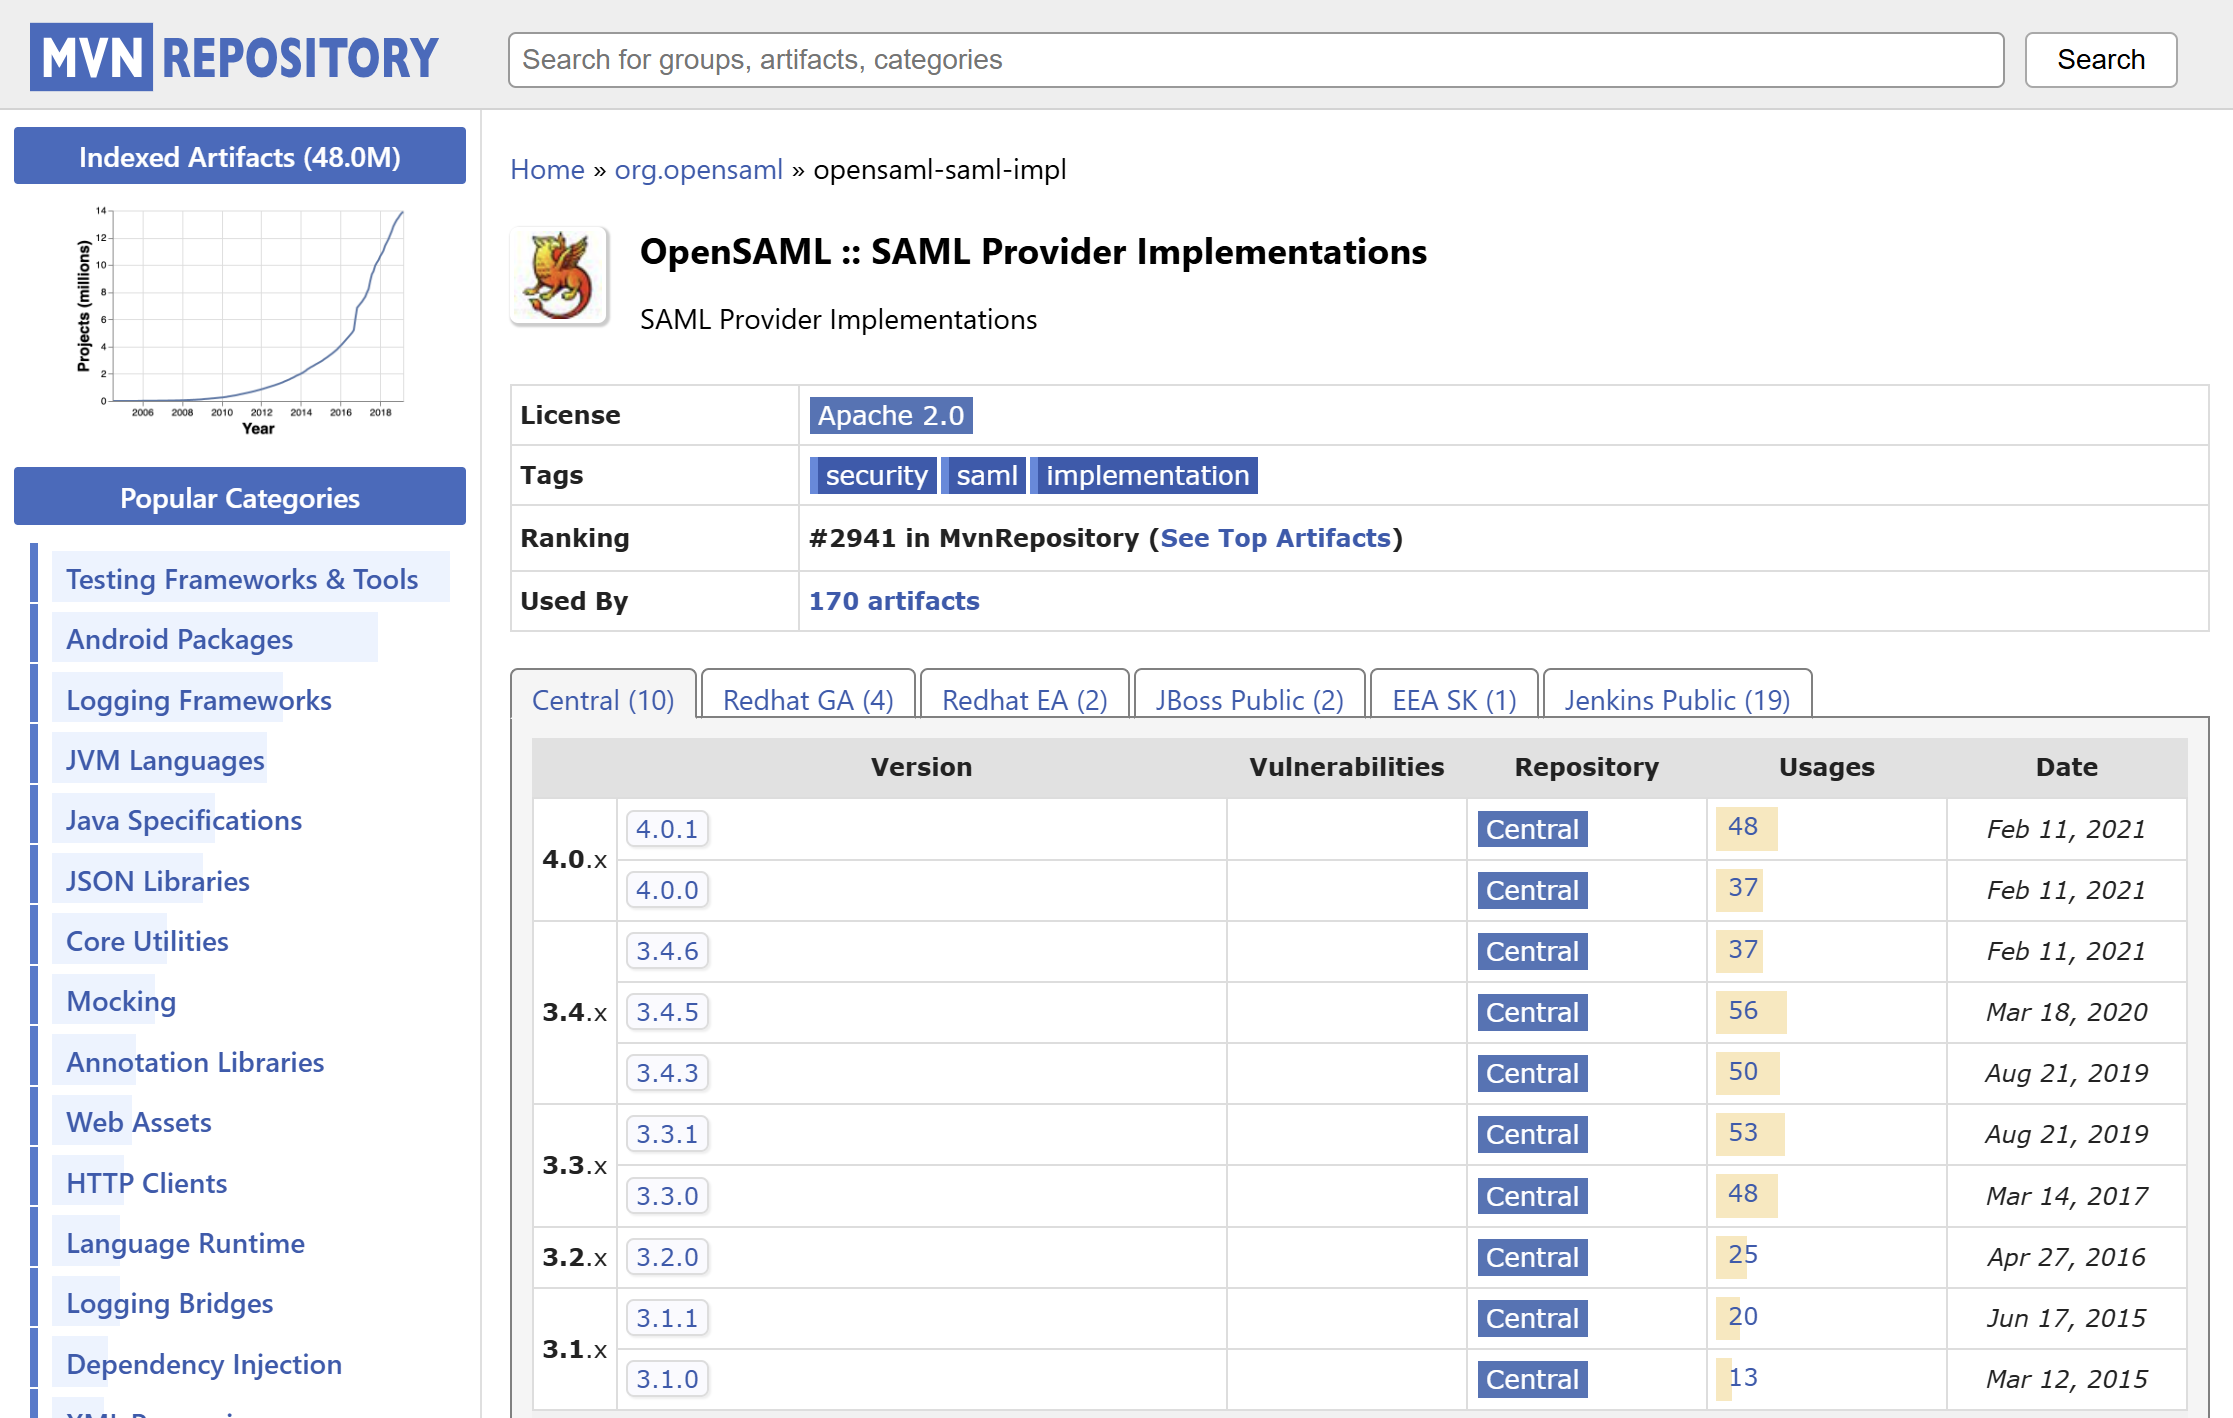
버전에 맞는 opensaml-saml-api 라이브러리가 없다는 오류가 발생했다.
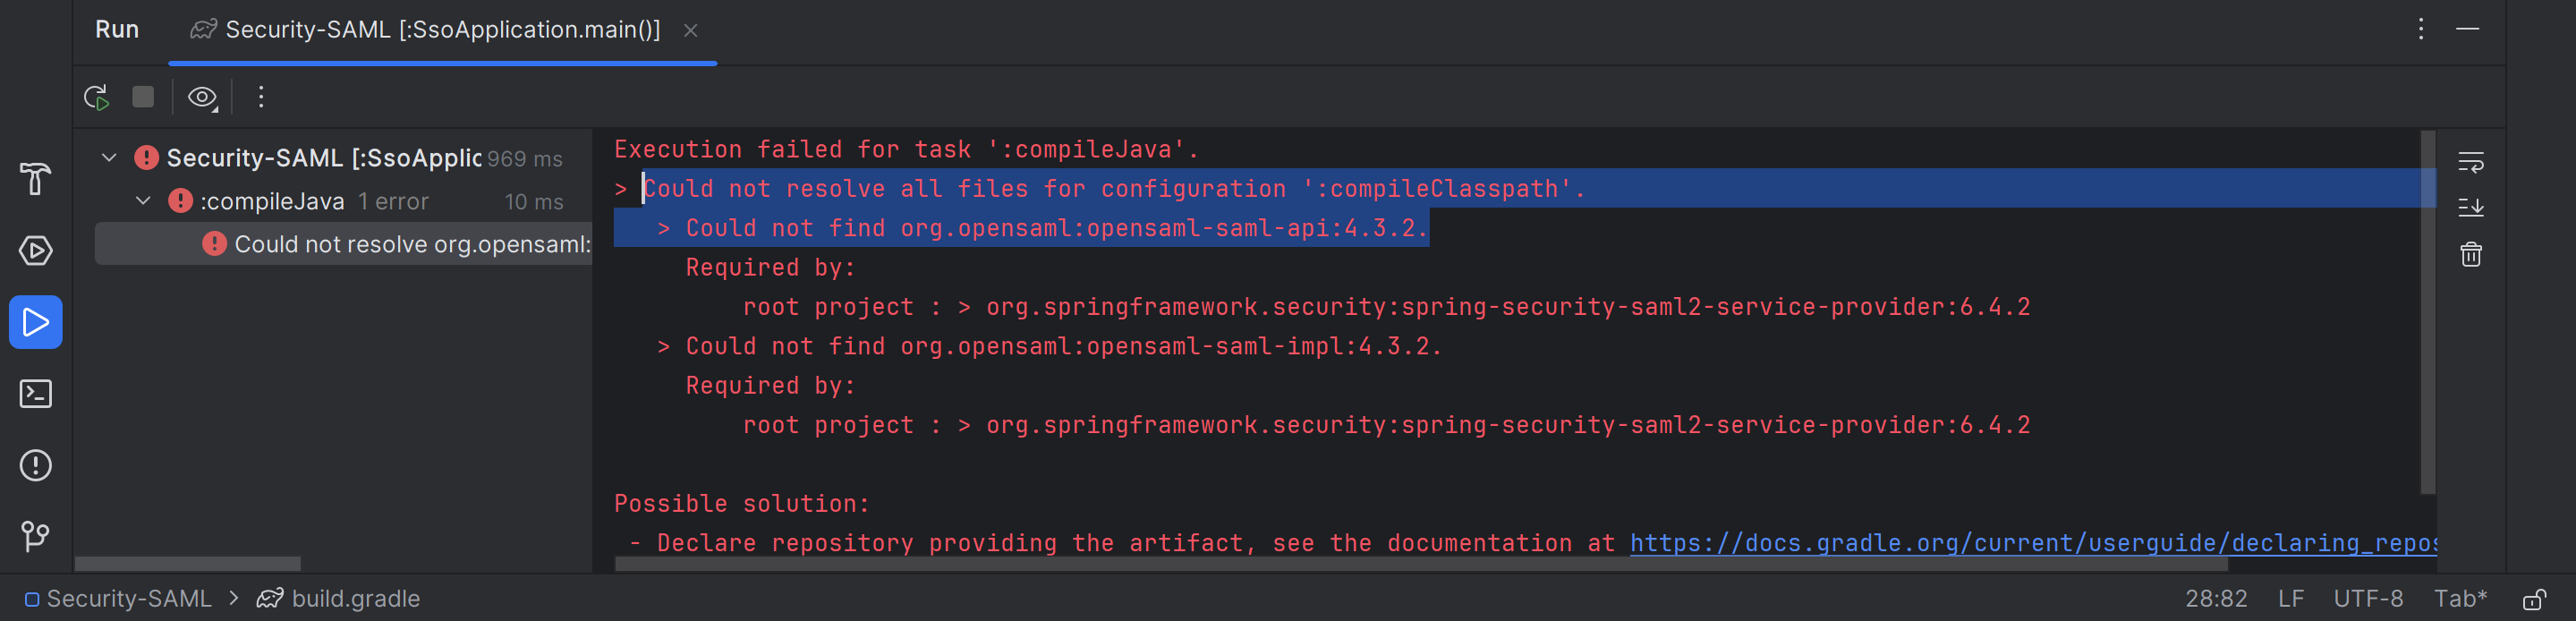
하지만 maven repository 에 가보니 opensaml-saml-api:4.3.2 버전은 없었다.
그렇다면 spring-security-saml2-service-provider 라이브러리의 버전을 낮춰서 implements 하자.
implementation 'org.springframework.security:spring-security-saml2-service-provider:5.8.12' // SAML 2.0
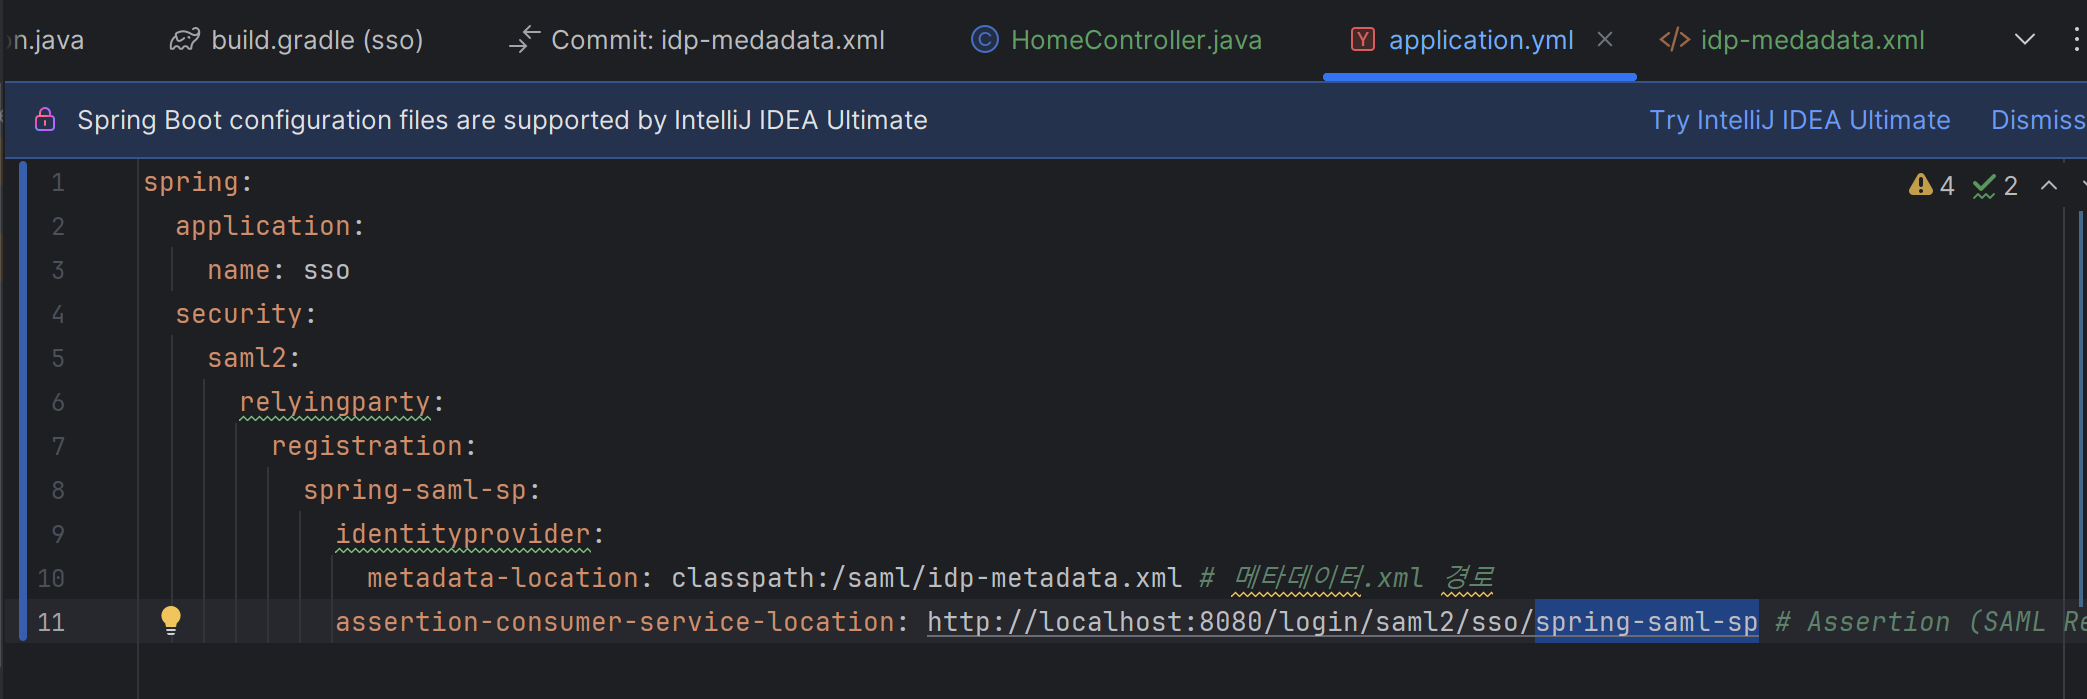
4. IdP 엔지니어에게 받은 metadata.xml 파일을 다운로드한다.
metadata.xml 파일을 /src/main/resources/ 하위에 저장한다.
그전에 metadata.xml 파일에서 수정해야할 부분이 있다.
entityID를 keycloak Client ID 로 지정한 값으로 맞춰주어야 한다.
<EntityDescriptor entityID="http://localhost:8080/spring-saml-sp">
그리고 해당 경로를 application.yml 에 명시해줘야 한다.
spring:
  security:
    saml2:
      relyingparty:
        registration:
          spring-saml-sp:
            identityprovider:
              metadata-location: classpath:/saml/idp-metadata.xml # 메타데이터.xml 경로
            assertion-consumer-service-location: http://localhost:8080/login/saml2/sso/spring-saml-sp # Assertion (SAML Response) 받을 경로 (ACS URL)
5. 임시 유저를 생성하자.
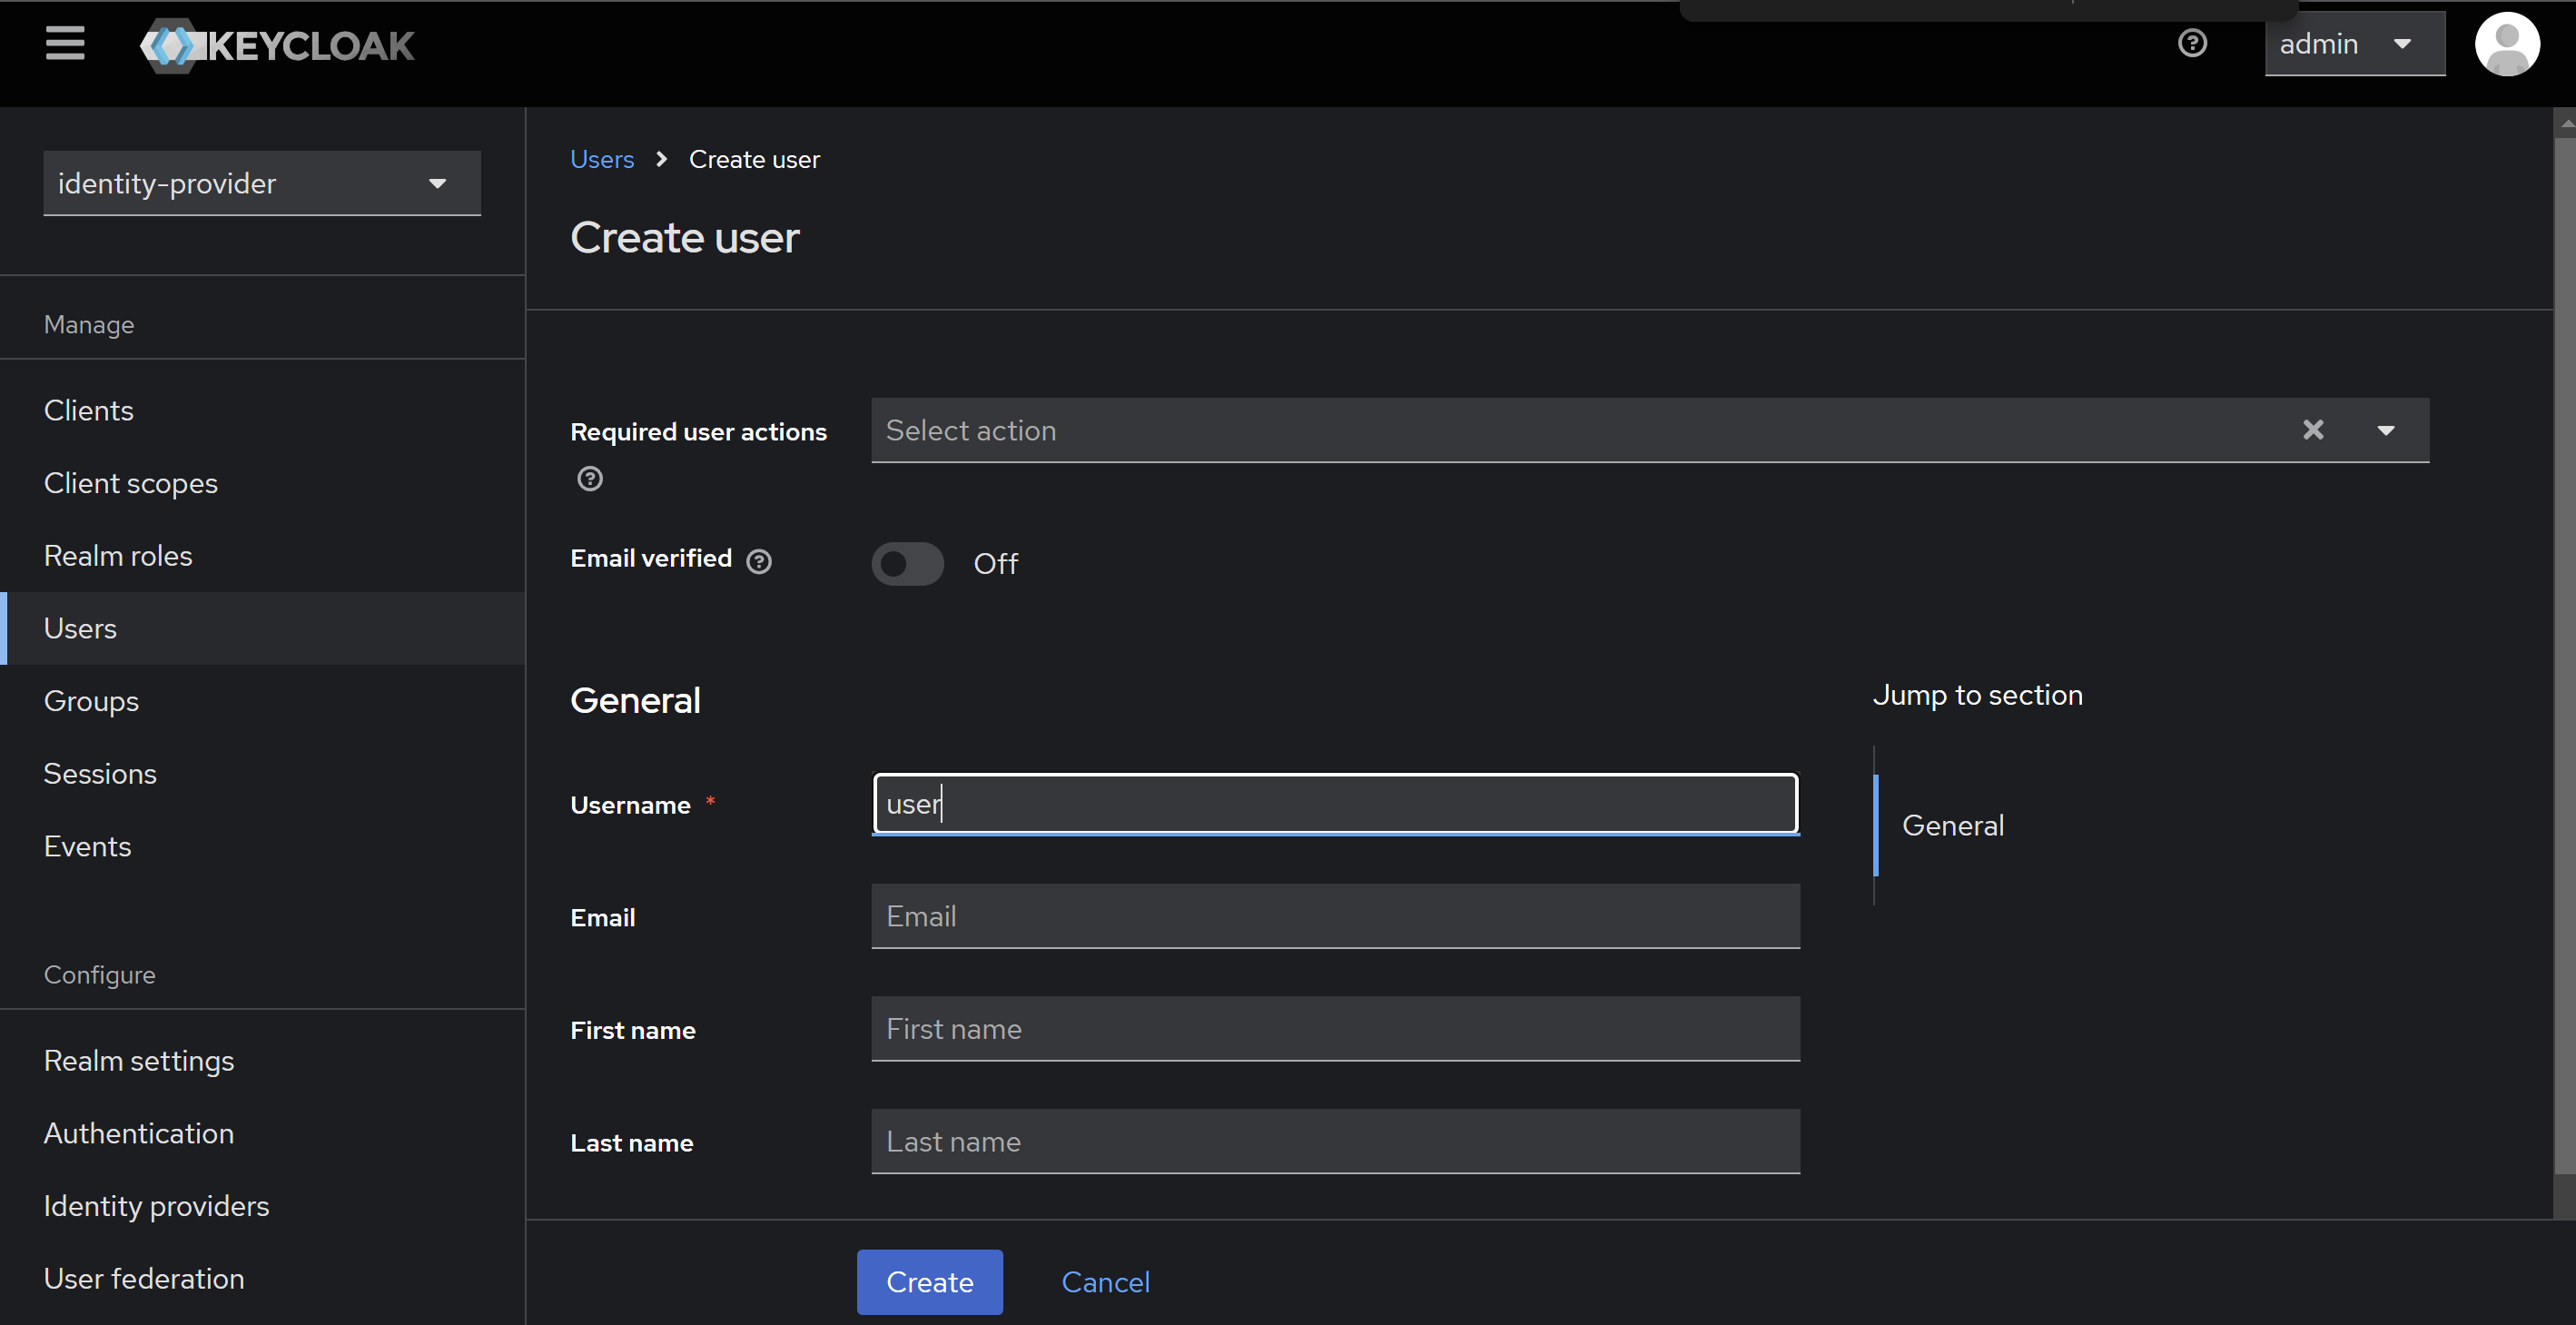
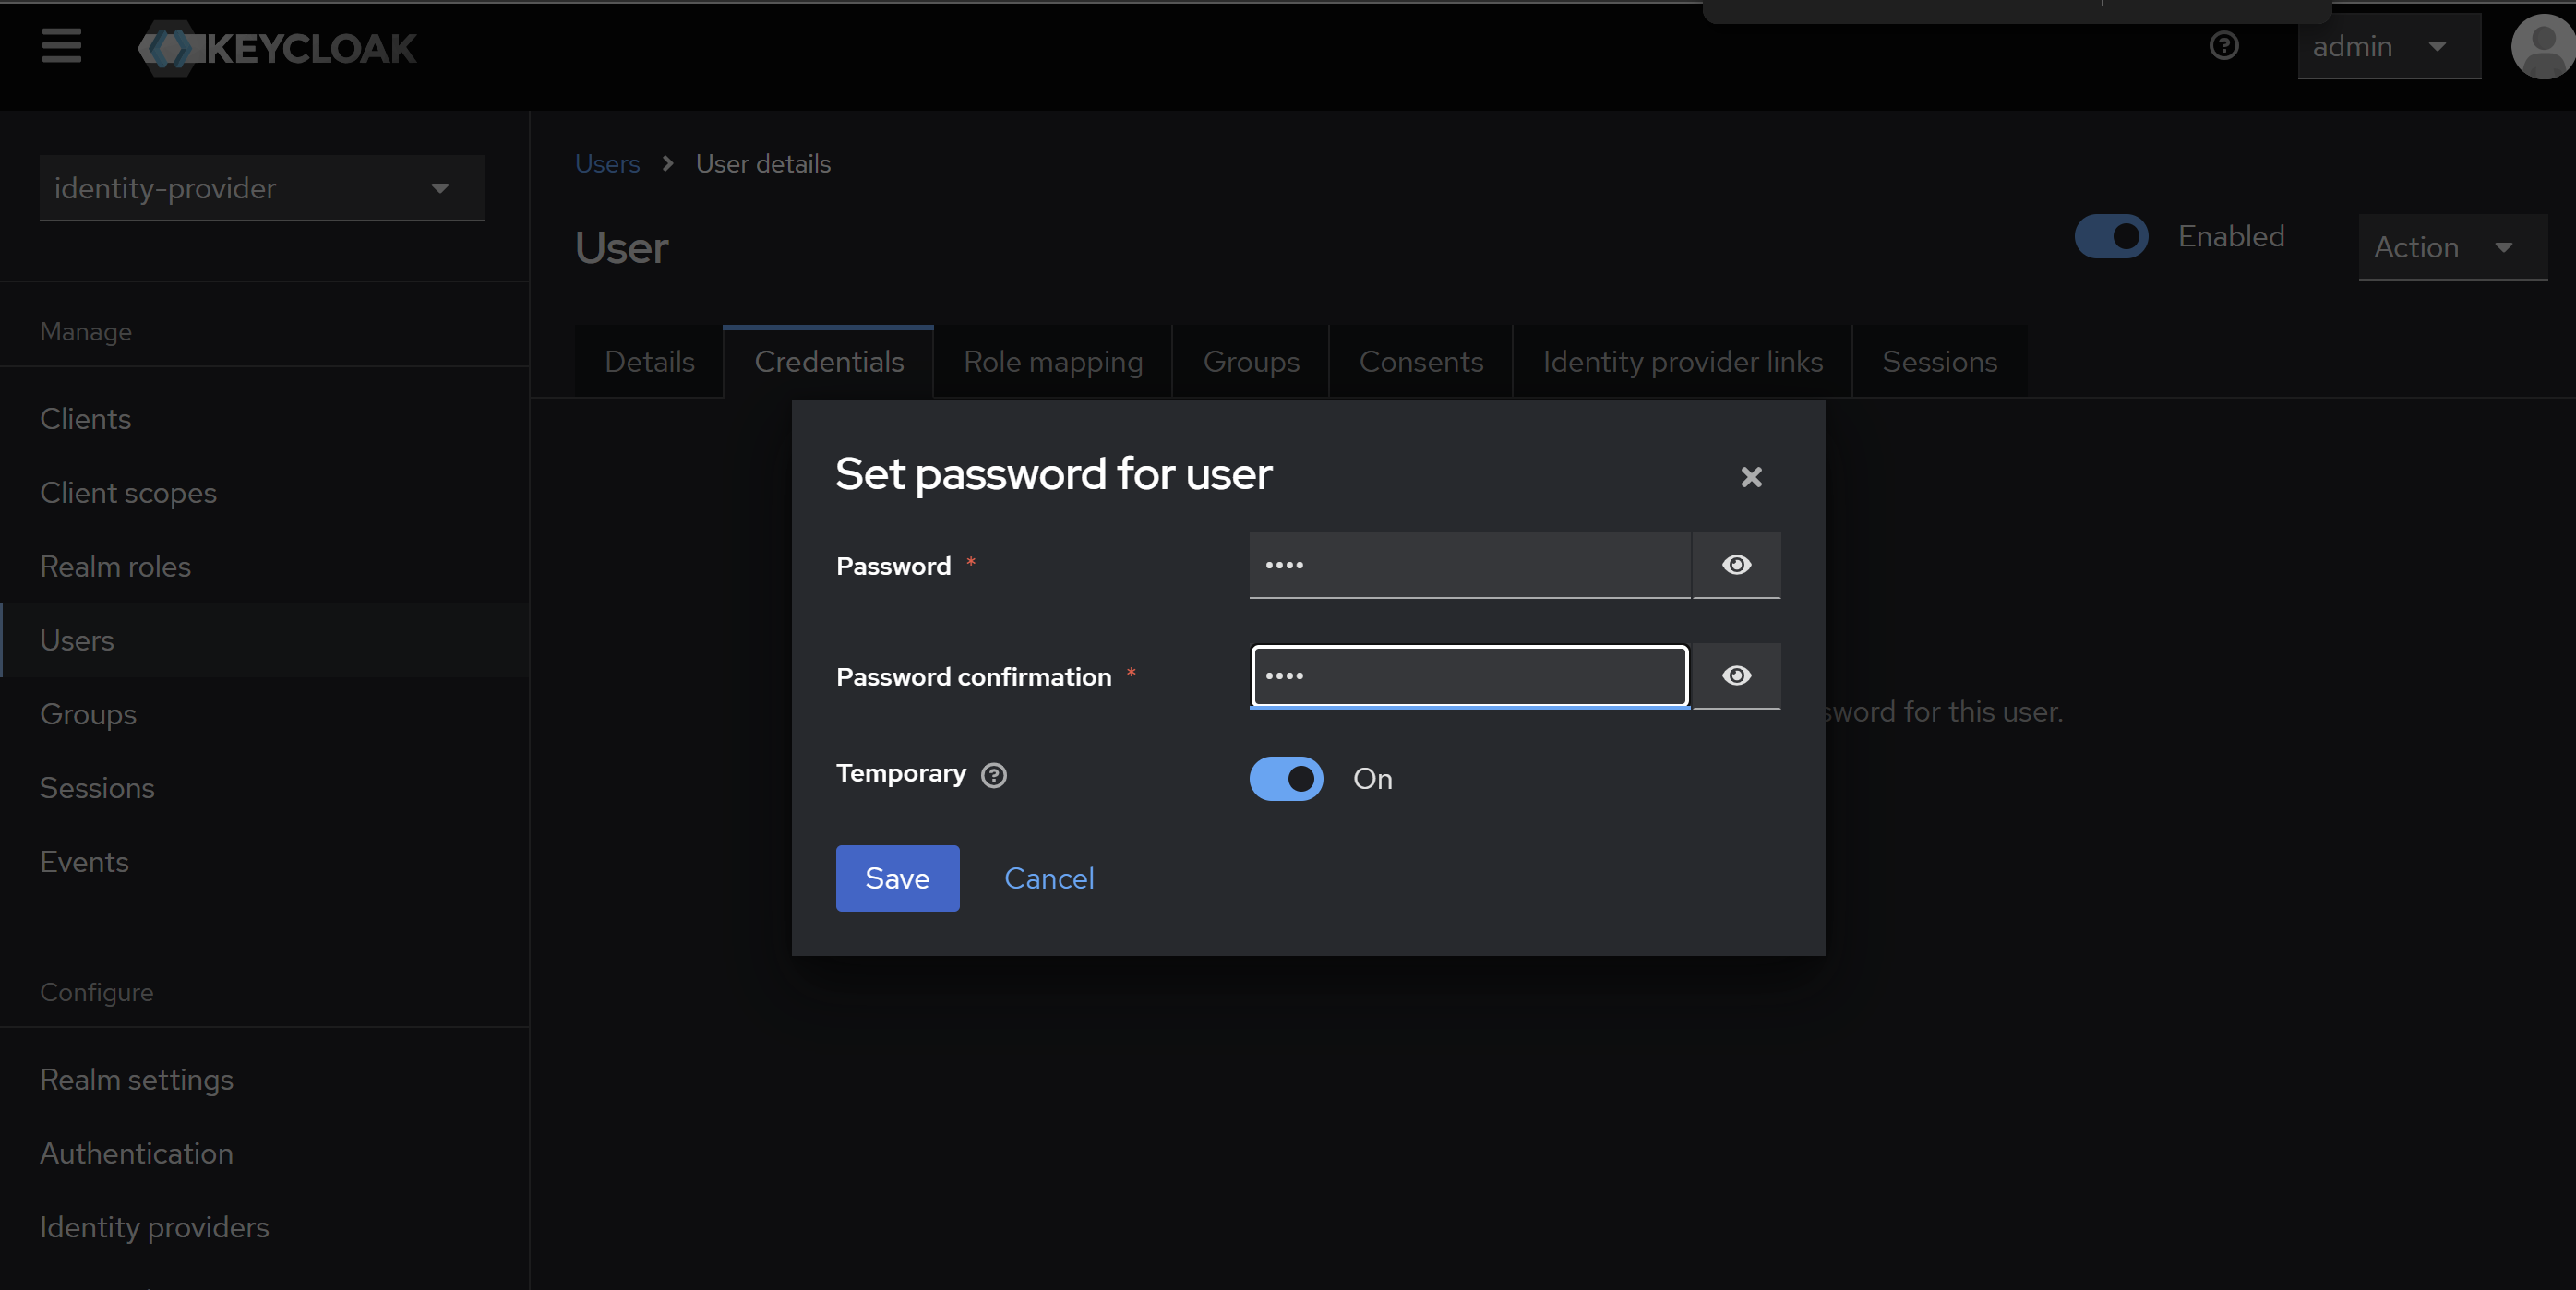
비밀번호도 설정완료!
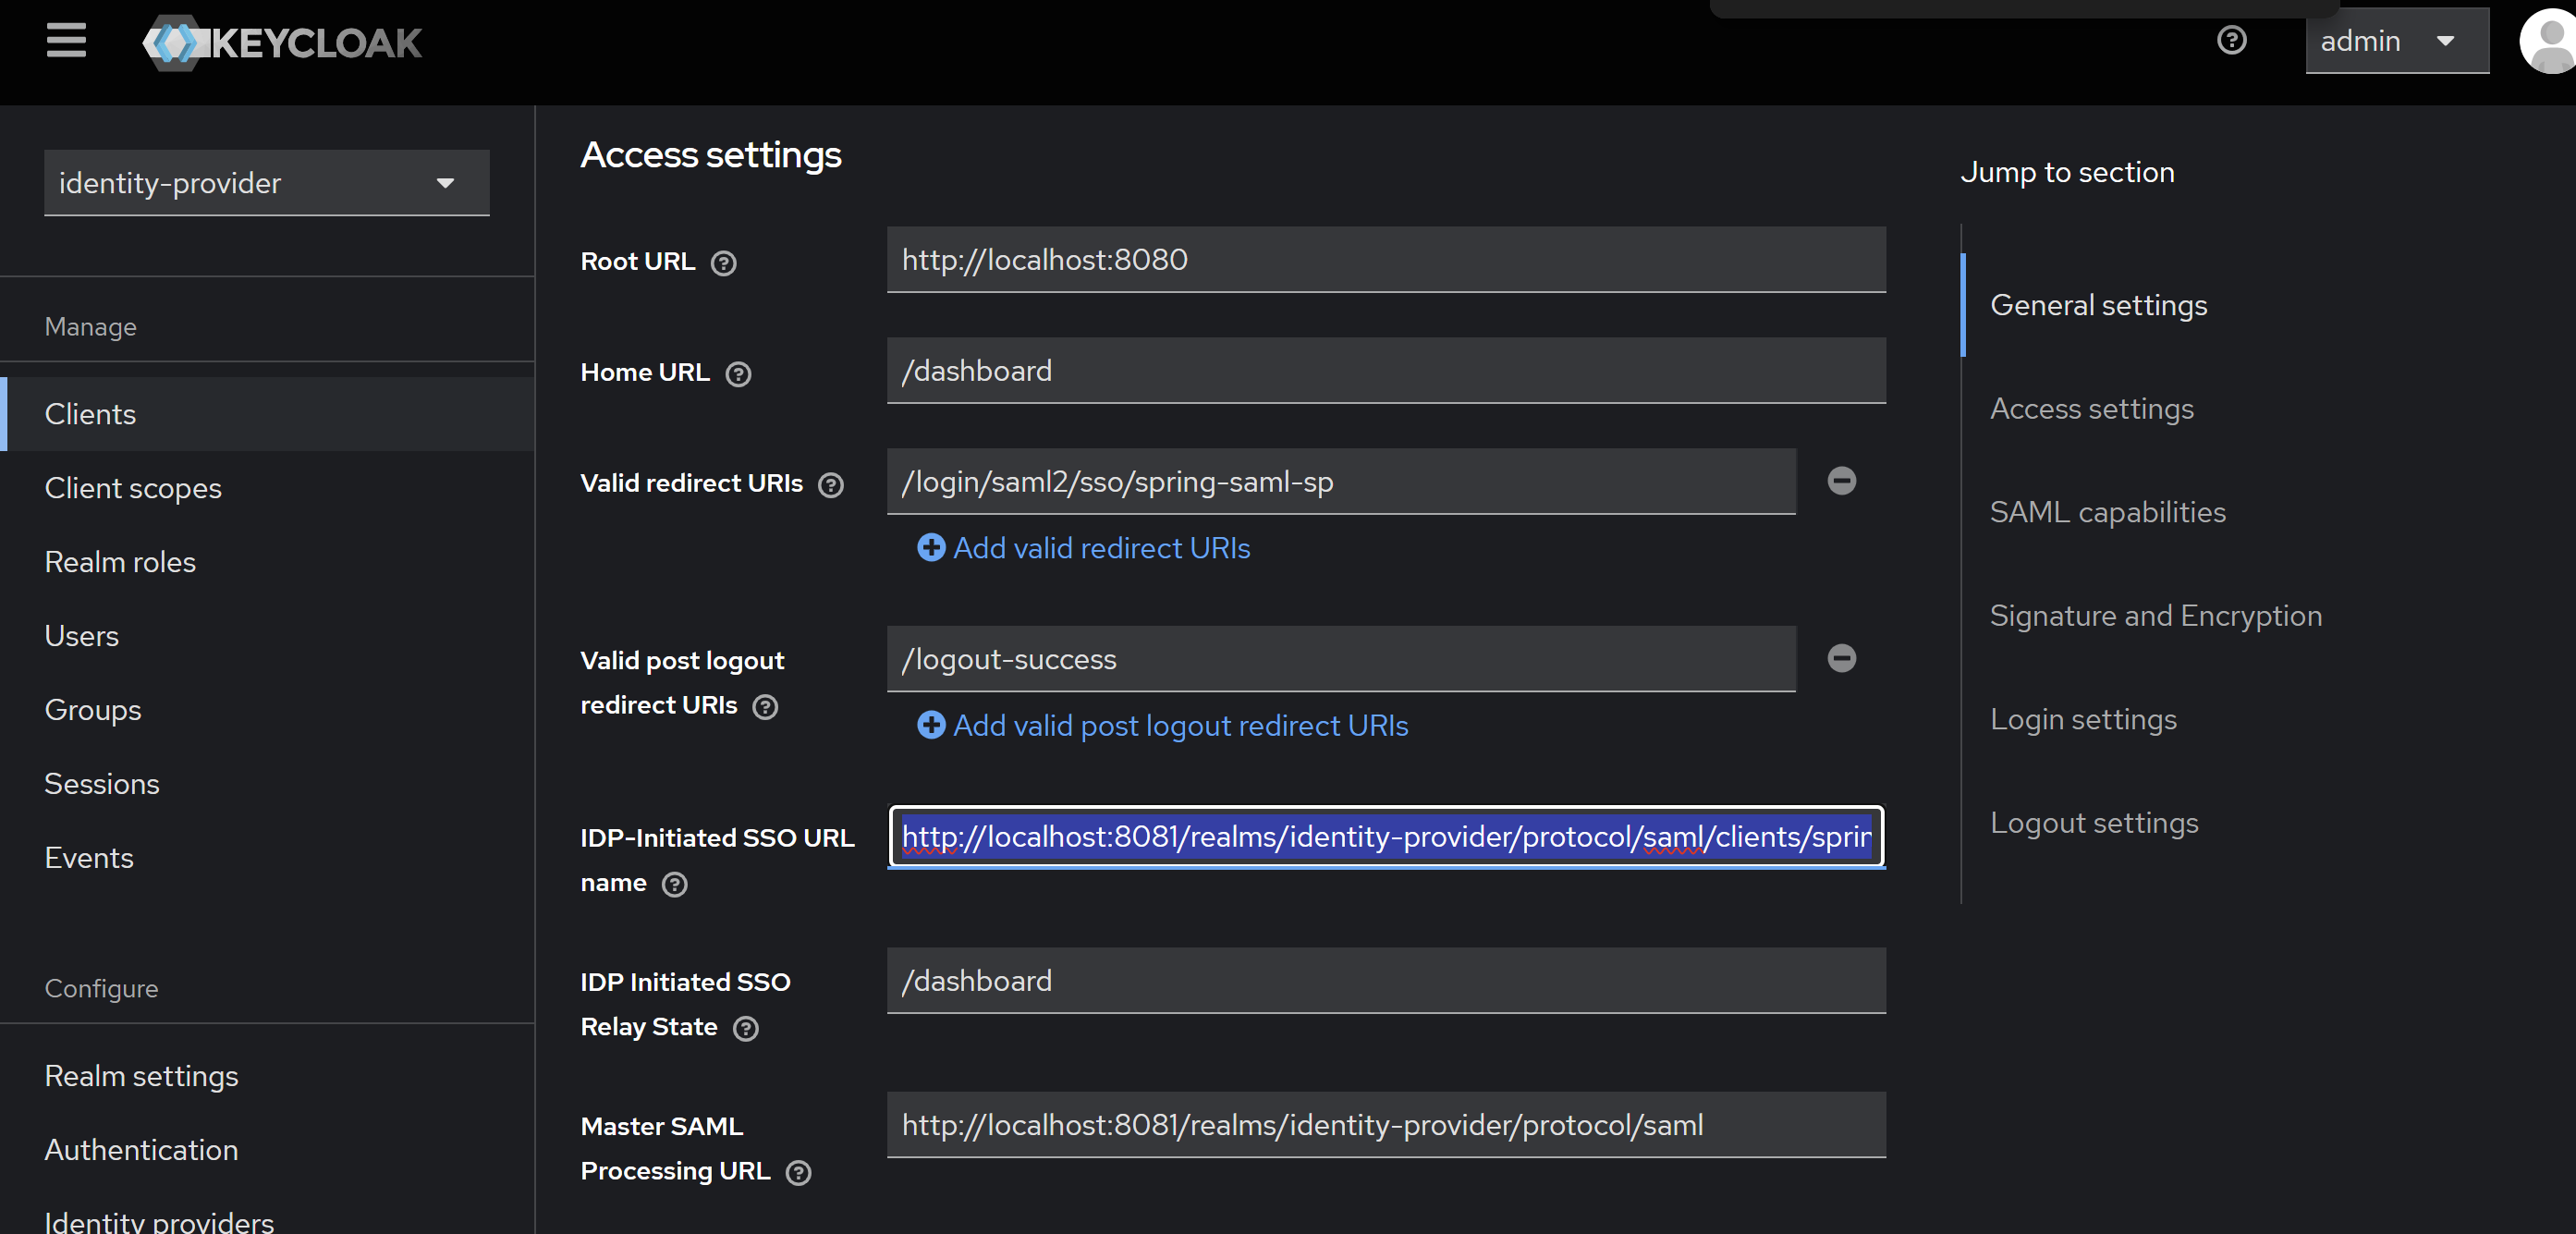
6. IDP-Initiated SSO 로 테스트해보자.
[형식]
http://<Keycloak-Host>/realms/<Realm-Name>/protocol/saml/clients/<Client-ID>

[예시]
http://localhost:8081/realms/identity-provider/protocol/saml/clients/spring-saml-sp
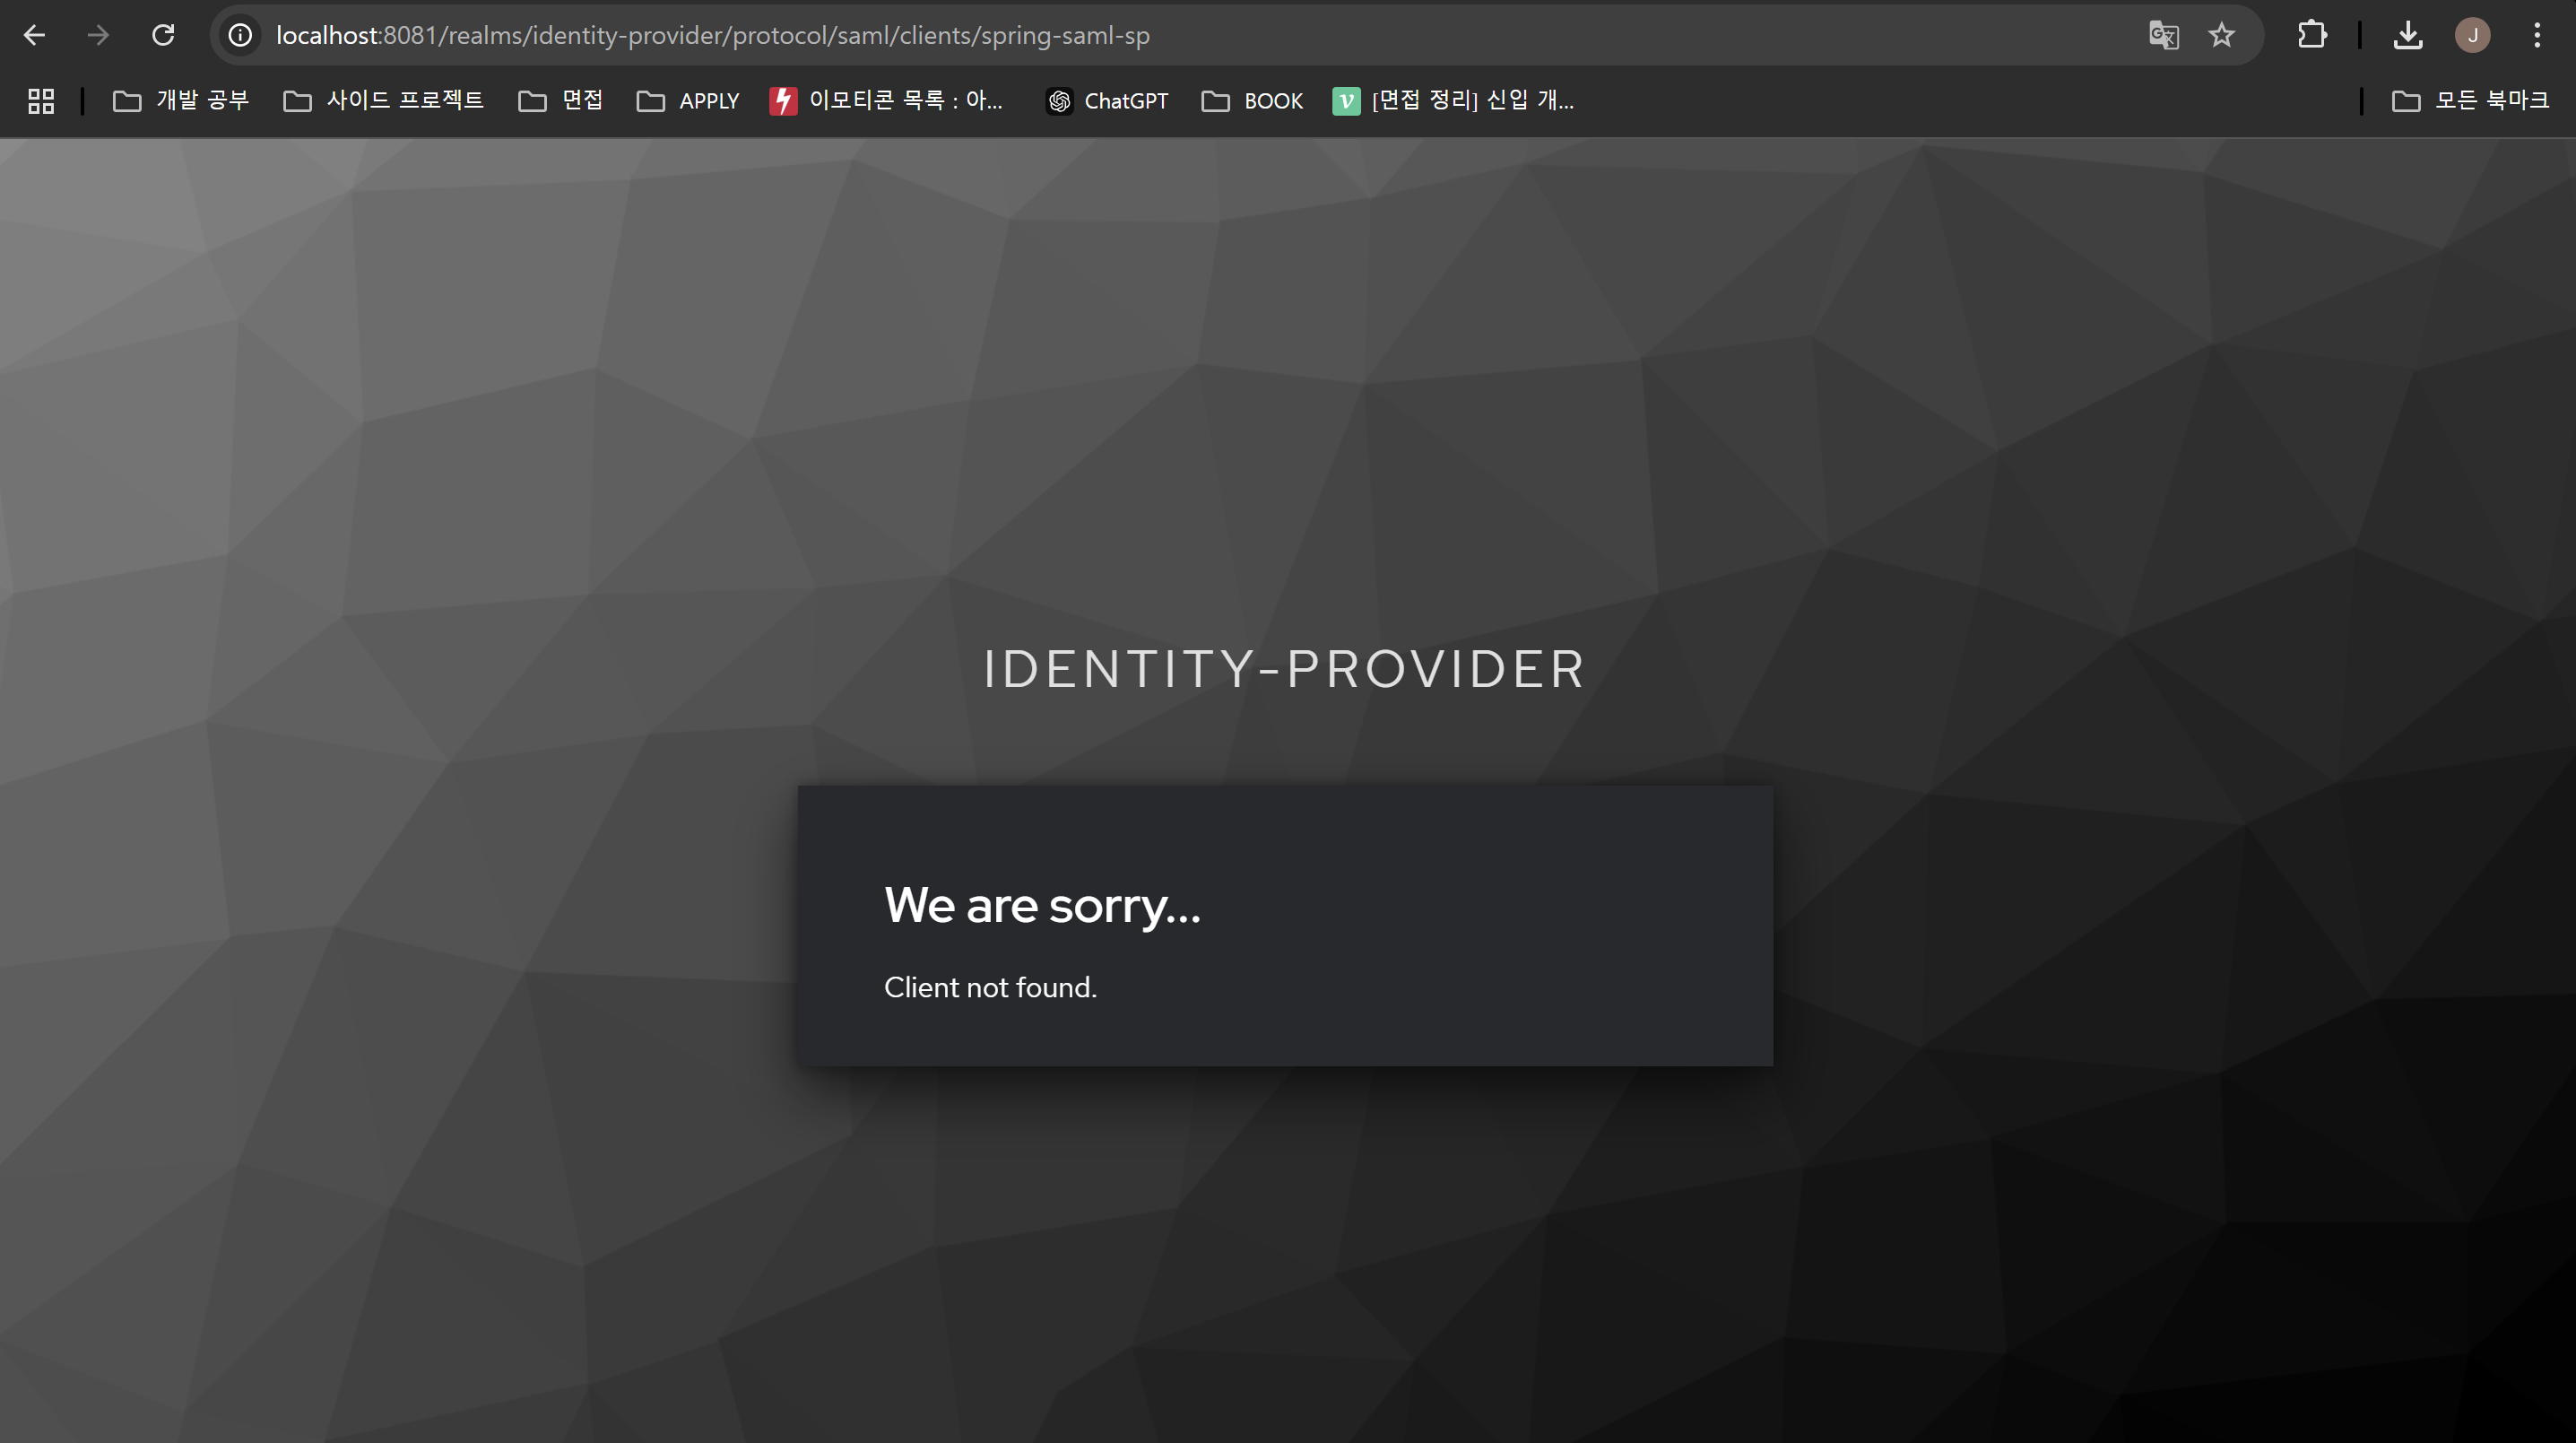

7. 문제발생. 왜 ClientId 가 "null" 로 받아와질까? SP 에서 설정 다시 검토.
① Client Id 확인해보기
keycloack 에 등록된 Client Id: spring-saml-sp
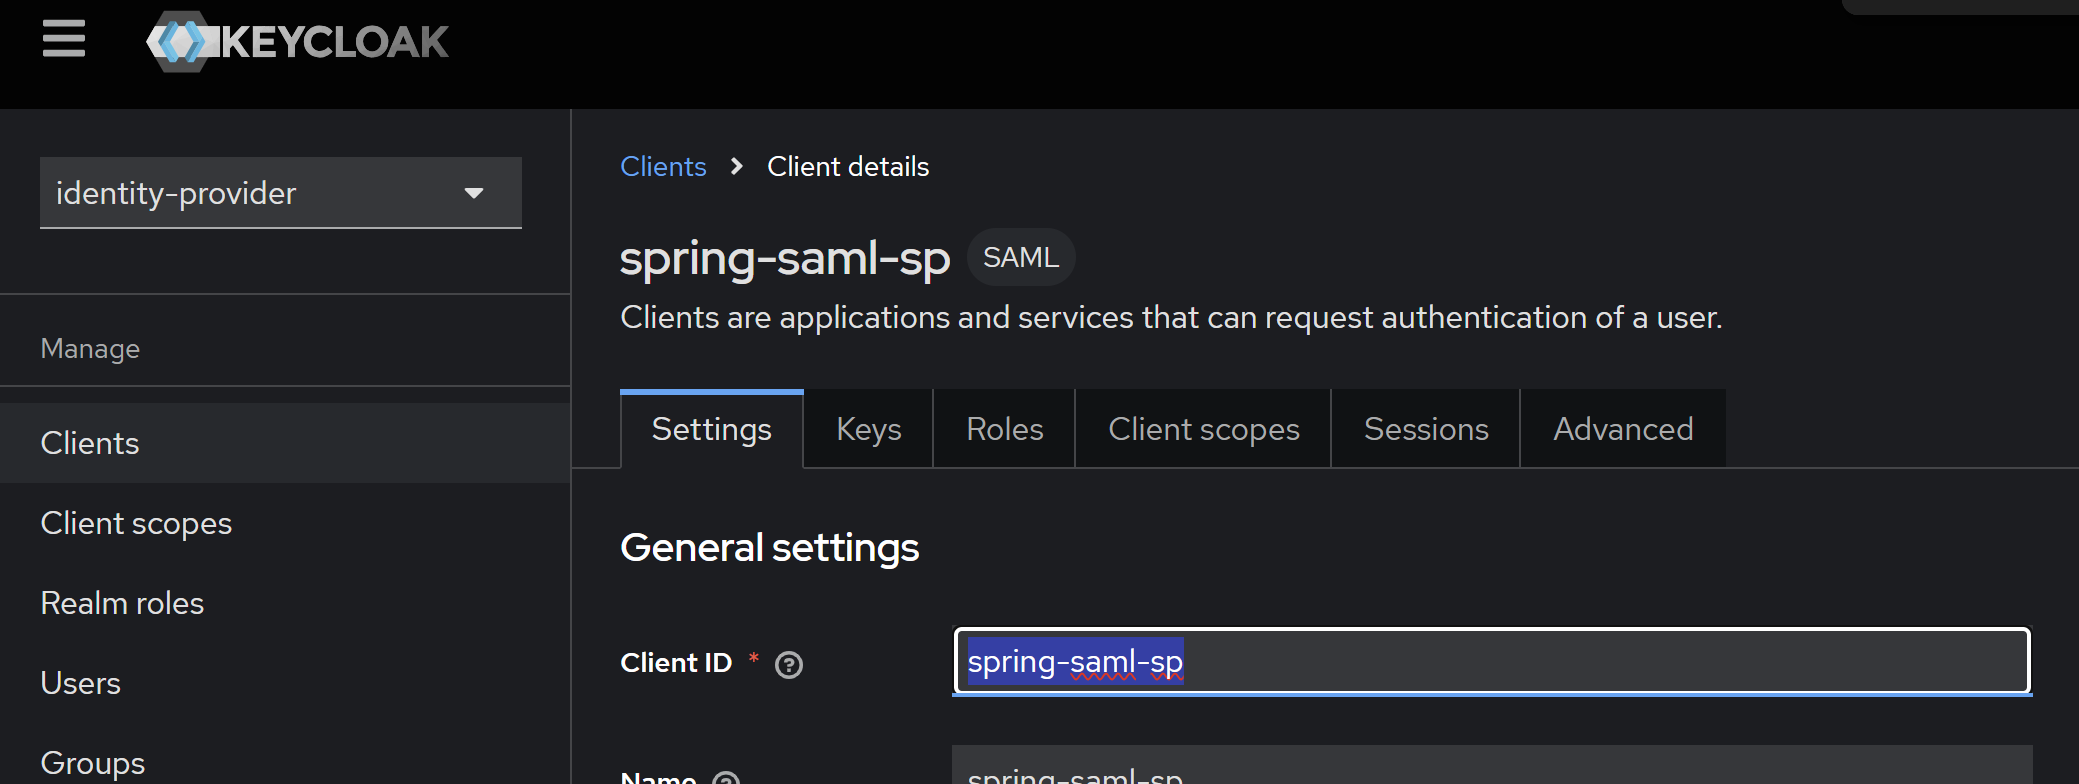
metadata.xml 에 지정한 entidyID 도 맞고 ...

application.yml 에서도 clientID를 잘 지정했는데 !
.. 어디서 Client ID 를 잘못 지정한거지?
라고 생각했는데 문제는 keycloak 에서 있었다.
설정을 이렇게하면 안된다! name 이니까 ClientID 를 지정해놓아야 한다!!!!!
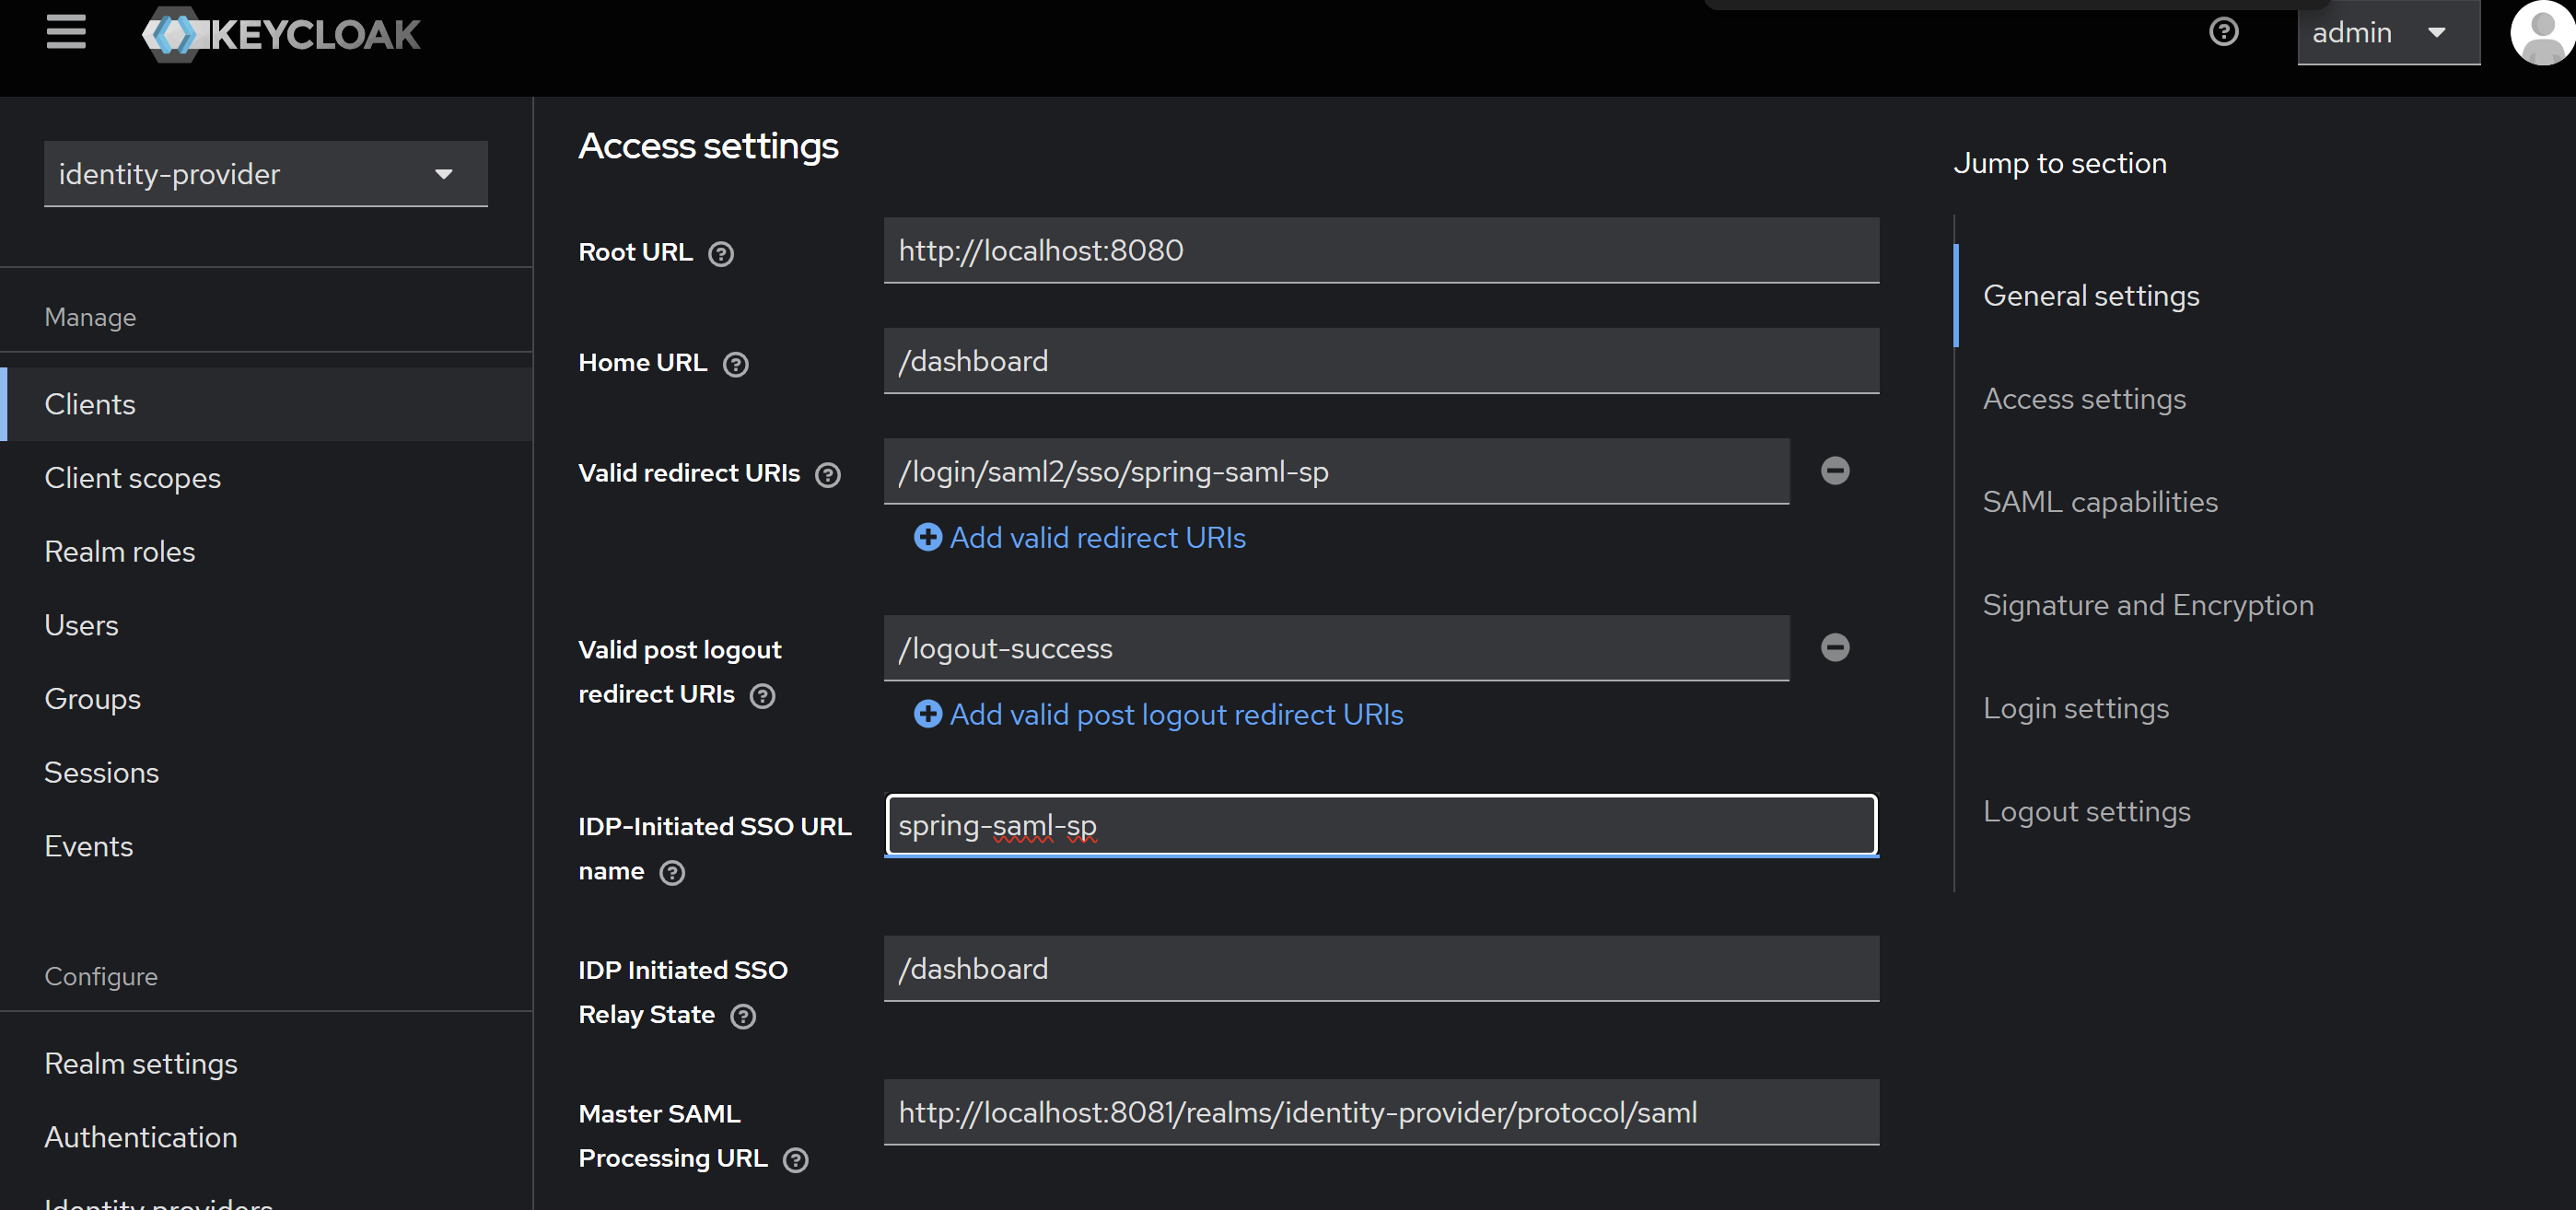
1편에 작성해놓았던 설정파일을 수정해야겠다.. 총총
8. 다시 IDP-Initiated SSO 로 테스트해보자.

접속성공!

keycloak 에서 미리 작성하지 못했던 필요한 정보를 묻는다. 착실히 작성해준다.
SP (Spring) 페이지로 리다이렉트.......
..성공?
9. SecurityConfig 클래스 작성해주기
@Configuration
@EnableWebSecurity
public class SecurityConfig {

    @Bean
    public SecurityFilterChain securityFilterChain(HttpSecurity http) throws Exception {
        return http
                .saml2Login(Customizer.withDefaults())
                .authorizeHttpRequests(auth -> auth
                        .anyRequest().authenticated()
                )
                .build();
    }

}
Spring Security 에게 SAML 2.0 으로 로그인할 것이라고 명시해주어야 한다.
오류 발생!!
org.springframework.beans.factory.UnsatisfiedDependencyException: Error creating bean with name 'org.springframework.security.config.annotation.web.configuration.WebSecurityConfiguration': Unsatisfied dependency expressed through method 'setFilterChains' parameter 0: Error creating bean with name 'securityFilterChain' defined in class path resource [spring/sso/common/config/SecurityConfig.class]: Failed to instantiate [org.springframework.security.web.SecurityFilterChain]: Factory method 'securityFilterChain' threw exception with message: org/springframework/security/saml2/provider/service/web/OpenSamlAuthenticationTokenConverter
뭔가 SAML 클래스 OpenSamlAuthenticationTokenConverter가 없다고 하니 라이브러리를 추가해주자.
아니면 버전이 안맞나?
dependencies {
	implementation 'org.springframework.boot:spring-boot-starter-web'
	implementation 'org.springframework.boot:spring-boot-starter-security'
	implementation 'org.springframework.security:spring-security-saml2-service-provider:6.1.2'
	implementation 'org.opensaml:opensaml-saml-api:4.0.1' // 추가
	implementation 'org.opensaml:opensaml-saml-impl:4.0.1' // 추가
	implementation 'org.opensaml:opensaml-core:4.0.1' // 추가
}
그러나 ...........................
치명적인 현재 상황 발생....
현재 상황 요약
- Spring Security 6.x 이상은 OpenSAML 4.3.x 이상을 요구
- Maven Central에는 OpenSAML 4.0.1까지만 제공되고, OpenSAML 4.3.x는 공식적으로 아직 릴리스되지 않았다....
- Spring Boot 3.x 이상 환경에서는 Spring Security 6.x와 호환성을 유지해야 하지만, OpenSAML의 부재로 인해 일부 기능에서 제약이 발생하고 있다 !!!!!!!.
결론.
현재 Spring Security 를 이용해서 SAML2.0 을 구현하는 건 포기해야 된다. ㅠㅠ
10. RequestURL 생성 로직부터.. 다시 해보자 ^^
다음 url 에는 RequestURL 명세에 대해서 정말 잘 나와있다.
https://developers.worksmobile.com/kr/docs/sso-idp-request
NAVER WORKS Developers
developers.worksmobile.com
Controller
@GetMapping("/sso/login")
public RedirectView redirectToIdP() {
    String samlRequest = samlApiService.createSamlRequest();
    String redirectUrl = samlApiService.getRedirectUrl(samlRequest);
    return new RedirectView(redirectUrl);
}
Service
package spring.saml.sp.service;

import org.springframework.stereotype.Service;
import org.w3c.dom.Document;
import org.w3c.dom.Element;

import javax.xml.parsers.DocumentBuilder;
import javax.xml.parsers.DocumentBuilderFactory;
import javax.xml.transform.Transformer;
import javax.xml.transform.TransformerFactory;
import javax.xml.transform.dom.DOMSource;
import javax.xml.transform.stream.StreamResult;
import java.io.StringWriter;
import java.net.URLEncoder;
import java.nio.charset.StandardCharsets;
import java.time.Instant;
import java.util.Base64;
import java.util.UUID;

@Service
public class SamlApiService {

    public String getRedirectUrl(String samlRequest) {
        String redirectUrl = "http://localhost:8081/realms/identity-provider/protocol/saml/clients/spring-saml-sp"
                + "?SAMLRequest=" + URLEncoder.encode(samlRequest, StandardCharsets.UTF_8)
                + "&RelayState=" + URLEncoder.encode("/dashboard", StandardCharsets.UTF_8);

        System.out.println("Redirect to: " + redirectUrl);
        return redirectUrl;
    }

    public String createSamlRequest() {
        try {
            Document authnRequestDoc = getAuthnRequest();

            TransformerFactory transformerFactory = TransformerFactory.newInstance();
            Transformer transformer = transformerFactory.newTransformer();
            DOMSource source = new DOMSource(authnRequestDoc);
            StringWriter writer = new StringWriter();
            transformer.transform(source, new StreamResult(writer));

            return Base64.getEncoder().encodeToString(writer.toString().getBytes(StandardCharsets.UTF_8));
        } catch (Exception e) {
            throw new RuntimeException("Failed to create SAML request - AuthnRequest", e);
        }
    }

    private Document getAuthnRequest() {
        try {
            DocumentBuilderFactory factory = DocumentBuilderFactory.newInstance();
            factory.setNamespaceAware(true);
            DocumentBuilder builder = factory.newDocumentBuilder();

            Document document = builder.newDocument();
            Element authnRequest = document.createElementNS("urn:oasis:names:tc:SAML:2.0:protocol", "samlp:AuthnRequest");
            authnRequest.setAttribute("AssertionConsumerServiceURL", "http://localhost:8080/saml/consume");
            authnRequest.setAttribute("ID", "_" + UUID.randomUUID());
            authnRequest.setAttribute("IssueInstant", Instant.now().toString());
            authnRequest.setAttribute("ProtocolBinding", "urn:oasis:names:tc:SAML:2.0:bindings:HTTP-POST");
            authnRequest.setAttribute("ProviderName", "spring-saml-sp");
            authnRequest.setAttribute("Version", "2.0");

            Element issuerElement = document.createElementNS("urn:oasis:names:tc:SAML:2.0:assertion", "saml:Issuer");
            issuerElement.setTextContent("http://localhost:8080/saml");
            authnRequest.appendChild(issuerElement);

            Element nameIDPolicyElement = document.createElementNS("urn:oasis:names:tc:SAML:2.0:protocol", "samlp:NameIDPolicy");
            nameIDPolicyElement.setAttribute("Format", "urn:oasis:names:tc:SAML:1.1:nameid-format:unspecified");
            authnRequest.appendChild(nameIDPolicyElement);

            document.appendChild(authnRequest);
            return document;
        } catch (Exception e) {
            throw new RuntimeException("Failed to create SAML request - AuthnRequest", e);
        }
    }
}
11. CORS 오류를 해결하자
그런데 왜인지 cors 오류가 났다. 일단 결론만 말하자면
Spring MVC 에서 기본적으로 제공하는 cors 필터만으로는 부족하다.
cors 필터를 커스텀해야 한다.
package spring.saml.sp.config;
import org.springframework.boot.web.servlet.FilterRegistrationBean;
import org.springframework.context.annotation.Bean;
import org.springframework.context.annotation.Configuration;
import org.springframework.web.cors.CorsConfiguration;
import org.springframework.web.cors.UrlBasedCorsConfigurationSource;
import org.springframework.web.filter.CorsFilter;

import java.util.List;

@Configuration
public class CorsConfig {

    @Bean
    public FilterRegistrationBean<CorsFilter> corsFilter() {
        UrlBasedCorsConfigurationSource source = new UrlBasedCorsConfigurationSource();
        CorsConfiguration config = new CorsConfiguration();
        config.setAllowCredentials(true); // 쿠키와 세션 허용
        config.setAllowedOrigins(List.of("http://localhost:8081", "http://localhost:3000"));
        config.setAllowedOriginPatterns(List.of("null")); // 명시적으로 null 허용
        config.setAllowedHeaders(List.of("*"));
        config.setAllowedMethods(List.of("GET", "POST", "OPTIONS"));
        source.registerCorsConfiguration("/**", config);

        FilterRegistrationBean<CorsFilter> bean = new FilterRegistrationBean<>(new CorsFilter(source));
        bean.setOrder(0); // 가장 먼저 실행되도록 우선순위 설정
        return bean;
    }
}
오류에 대한 자세한 내용은 다음을 참고해보자.
https://jinn-o.tistory.com/352
[Spring MVC] WebMvcConfigurer로 cross-origin 설정을 해도 cors 오류가 나는 이유 (304 응답에서)
이 문제 때문에 며칠을 애먹었는지 모른다. 아무튼 결론부터 말하겠다. Spring MVC는 3xx 응답(특히 304)에는 CORS 헤더를 자동으로 추가하지 않는다 ... 아무리 내가 다음과 같이 지정했다고 해도 말
jinn-o.tistory.com
12. http://localhost:8080/saml/login 으로 이동하자. (SAML Request 전송)
13. acs url 에 SAML Response 가 잘담겨있다


14. 다음으로
React 까지 연결해보자.
https://jinn-o.tistory.com/353
[SAML 2.0] IdP 와 SP 인증을 직접 구현해보자. (3) - SP 설정 : React편
0. 준비작업이전 포스팅 1편 - IdP 구성https://jinn-o.tistory.com/321 [SAML 2.0] IdP 와 SP 인증을 직접 구현해보자. (1) - IdP 설정0. 준비작업먼저 SAML 2.0 의 구조나 개념, 동작방식에 대해서 예습해오자.https:/
jinn-o.tistory.com
'Framework > Spring' 카테고리의 다른 글
| [Servlet] ServletRegistrationBean : Spring 이 Servlet 을 다루는 방법 (0) | 2025.01.07 |
|---|---|
| [Spring Security] SecurityContextHolder, 인증 정보 저장 객체 (0) | 2024.12.30 |
| [SAML 2.0] IdP 와 SP 인증을 직접 구현해보자. (1) - IdP 설정 (0) | 2024.12.20 |
| [SAML 2.0] Security Assertion Markup Language (0) | 2024.12.18 |
| [OAuth2] 기본적인 로그인 연동은 이미 스프링에서 구현해놓았다? (0) | 2024.12.08 |